Really WTF Cloth

Picture_20180529_122317644

What you need:

Size 5mm/H hook

Roughly 50 yards medium 4 cotton weight yarn, I have used Bernat Handicrafter and I have also used double strand of Cotton Fair

Yarn, crochet hooks and scissors

SL ST – Slip Stitch                                      DC – Double Crochet

CH – Chain                                                   RPT – Repeat

SC – Single Crochet                                    ST – Stitch

RW – Row                                                    SK ST – Skip Stitch

Gauge:

Width: 4 ST = 1″

Length: 2 RW = 1″

Pattern Notes

This is a very simple dishcloth pattern. I started creating word dishcloth patterns shortly after I did a knit version for an order. It’s so fun to be able to create a crochet version that my crochet friends will enjoy. You will only use the DC ST and a CH to create the letters to the word.

Please note that the CH STS will count as a ST.

In order to line up my DC ST a little more in the beginning of each RW I skip the CH 2 STs and the 1St ST and start the DC in the 4th ST directly over the DC below. Then follow the pattern for the RW and your final ST should be placed in the CH 2 ST from the RW below.

DC (Double crochet) – YO, insert hook into next ST, YO, pull through ST (3 loops on hook), YO, Pull through 2 loops, (2 loops on hook), YO, pull through all loops on hook.

Here we go:

CH 35

RW 1 – DC into the 5th CH from the hook, CH 1, SK ST, DC into the next ST, *CH 1, SK ST, DC into the next ST, RPT from * to end of RW, CH 3, turn (33 ST) (17 DC)

RW 2 – DC into the top of 2nd DC, CH 1, SK ST, *DC into top of next DC, CH 1, SK ST, RPT from * to end of RW, CH 2, turn (33 ST) (17 DC)

RW 3 – DC all across, CH 2, turn (33)

RW 4 – RPT RW 3

RW 5 – RPT RW 3

RW 6 – DC next 8, CH 1, SK ST, DC next 4, CH 1, SK ST, DC next 6, CH 1, SK ST, DC next 3, CH 1, SK ST, DC last 7, CH 2, turn (33 including CH 2)

RW 7 – DC next 4, CH 1, SK ST, DC next 3, CH 1, SK ST, DC next 3, CH 1, SK ST, DC next 4, CH 1, SK ST, DC next 4, CH 1, SK ST, DC last 9, CH 2, turn (33 including CH 2)

RW 8 – DC next 8, CH 1, SK ST, DC next 4, CH 1, SK ST, DC next 4, CH 1, SK ST, DC next 3, CH 1, SK ST, DC next 3, CH 1, SK ST, DC last 5, CH 2, turn (33 including CH 2)

RW 9 – DC next 4, CH 1, SK ST, DC next 7, CH 1, SK ST, DC next 4, CH 1, SK ST, DC next 4, CH 1, SK ST, DC, CH 1, SK ST, DC last 7, CH 2, turn (33 including CH 2)

RW 10 – DC next 8, CH 1, SK ST, DC next 4, CH 1, SK ST, DC next 4, CH 1, SK ST, DC next 7, CH 1, SK ST, DC last 5, CH 2, turn (33 including CH 2)

RW 11 – DC next 4, CH 1, SK ST, DC next 7, CH 1, SK ST, DC next 4, CH 1, SK ST, DC next 4, CH 1, SK ST, DC last 9, CH 2, turn (33 including CH 2)

RW 12 – DC next 4, CH 1, SK ST, DC, CH 1, SK ST, DC, CH 1, SK ST, DC, CH 1, SK ST, DC, CH 1, SK ST, DC, CH 1, SK ST, DC, CH 1, SK ST, DC, CH 1, SK ST, DC next 7, CH 1, SK ST, DC last 5, CH 2, turn (33 including CH 2)

RW – 13 – DC all across, CH 2, turn (33)

RW – 14 – RPT RW 13

RW – 15 – DC all across, CH 3, turn (33)

RW – 16 – DC into the top of 2nd DC, CH 1, SK ST, *DC into top of next DC, CH 1, SK ST, RPT from * to end of RW, CH 3, turn (33 ST) (17 DC)

RW – 17 – DC into the top of 2nd DC, CH 1, SK ST, *DC into top of next DC, CH 1, SK ST, RPT from * to end of RW (33 ST) (17 DC)

Turn your work so you are working on the front of the cloth. SC 3 in the 1st ST, SC all across, 3 SC in the corner ST, SC across (roughly 28), 3 SC in the corner ST, SC across, 3 SC in corner ST, SC across (roughly 28), SC in the BLO around the boarder 1 more time being sure to crochet 3 SC in each corner ST.

CH 1, cut a 5″ tail and weave in all loose ends.

I hope you enjoy making these dishcloths as much as I do!

If you have any questions or concerns please feel free to contact me.

Please note that you are welcome to sell your finished products however, I would appreciate if you link back to me at Teez Topperz when you post or advertise your finished pieces.

Copyright © 2018 Teez Topperz. DO NOT COPY, REPRODUCE, OR PUBLISH IN ANY MANNER. Images are the sole property of Teez Topperz and are not to be used for resale, personal reasons, or any other means. All rights reserved. The sale of your finished product is permitted; however please provide credit for the pattern to Teez Topperz. No part of this document can be reproduced or transmitted in any form by any means: electronic, mechanical, photocopying or otherwise.


Simple Souch

Happy Friday everyone.  Welcome to the final pattern in my learn to crochet series.  You will find Simple Crochet Cloth was the first pattern in this series and we concentrated on the Single Crochet stitch.  The second pattern was the Teez Bandana Scarf which we concentrated on using the Half Double Crochet stitch.  We are now working on the Double Crochet stitch and learning to work in the round.  We will also use the single crochet stitch again to create the band all while still working in the round.  These 3 patterns give you all the most common basic stitches.  Of course there are hundreds of other cool stitches and items to make with crochet.  The options are limitless!

I decided to create and share this series with you all because I love yarn, I love teaching and sharing my knowledge and it fills me with joy to see people create something especially when its something that I have personally inspired them to create.  I feel that this journey is just beginning for me and you will soon find so much more being shared for you all.

Now lets learn to make a hat together!

What you need:

Size 6mm/J for this teen/adult size

Roughly 120 yards medium 4 worsted weight yarn, I have used Vanna’s Choice Lion Brand and Bernat Premium.

Yarn, crochet hooks and scissors if you wish you may want to add a Faux Fur Pompom and a button

SL ST – Slip Stitch                          DC – Double Crochet

CH – Chain                                       RND – Round

SC – Single Crochet                       RPT – Repeat

YO – Yarn over                              ST – Stitch

RW – Row

Gauge:

Width: 3 ST = 1″

Length: 2 RW = 1″

Pattern Notes

This Simple Slouch was named the Simple Slouch for just that reason. It is a simple, easy and beginner friendly pattern I created to go in my learn to crochet series. This pattern is worked in the round and you will only use the DC (double crochet) and SC (single crochet) stitch. You will not count the CH (chain 1) in the beginning of each round as a stitch). You will work your first stitch in the same space as your CH 1 (chain 1) and SL ST (Slip stitch). If you are more familiar with crochet and prefer to start your hat with the magic circle you may also do that and I have included a video I used to learn how to create the magic circle below.

DC (Double crochet) – YO, insert hook into next ST, YO, pull through ST (3 loops on hook), YO, Pull through 2 loops, (2 loops on hook), YO, pull through all loops on hook.

Photos to refer to are at the bottom of the pattern.

Here we go:

Teen/Adult –18.5″ circumference

STart 1

make a loop

start 2

run your yarn under the loop

start 3

insert your hook on top of the loop but under the yarn running through the loop

start 4

pull both ends to tighten on the hook

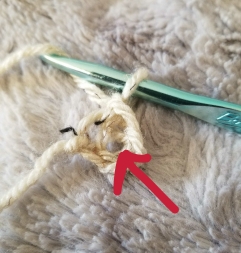
Ch 3, SL ST into the 1ST CH, CH 1

ch 1

YO

ch 2

pull through

ch 3

3 chains on hook

ch 4

flip your chain over and work in the back hump

ch 5

insert hook into 1st

ch 6

YO

ch 7

pull through all loops on hook


RND 1 – 10 DC into the center hole, SL ST to the 1ST DC (10) (Or Create magic circle, CH 1, 10 DC in magic circle, SL ST to 1ST DC (10)

ch circle

You now have a circle and you will work your DC in the center

dbc1

YO


dbc2

insert hook into the center or the stitch

dbc3

3 loops on hook


dbc4

YO and pull through 2 loops on hook

dbc5

2 loops remain on hook


dbc6

YO and pull through both loops on hook

dbc7

DC complete


sl st 1

how to slip stitch your DC together

sl st 2

insert hook into 1st DC


sl st 3

YO

sl st 4

pull through the stitch and loop on your hook


RND 2 – CH 1, 2 DC in same ST as CH 1, 2 DC in each ST around, SL ST to 1st DC (20)

RND 3 – CH 1, 2 DC in same ST as CH 1, DC in next ST, *2 DC in next ST, DC in next ST, RPT from * all around, SL ST to 1ST DC (30)

RND 4 – CH 1, 2 DC in same ST as CH 1, DC in next 2 STs, *2 DC in next ST, DC in next 2 STs, RPT from * all around, SL ST to top of 1ST DC (40)

RND 5 – CH 1, 2 DC in same ST as CH 1, DC in next 3 STs, *2 DC in next ST, DC in next 3 STs, RPT from * all around, SL ST to top of 1ST DC (50)

RND 6 – CH 1, 2 DC in same ST as CH 1, DC in next 4 STs, *2 DC in next ST, DC in next 4 STs, RPT from * all around, SL ST to top of 1ST DC (60)

RND7 – CH 1, DC in the same ST as CH 1, DC in each ST around, SL ST to top of the 1ST DC (60)

RND 8-18 – Rpt RND 7

Band (work this part loosely or your band may work up to be to small)

RND 19 – CH 1, SC in the same ST as CH 1, SC in each ST around, SL ST to top of 1ST SC (60)

ssc1

SC – insert hook into stitch

ssc2

YO


ssc3

pull through the stitch (2 loops on hook)

ssc4

YO


ssc5

pull through both loops on hook


RND 20-24 – RPT RND 19

CH 1, cut a 5″ tail and weave in all loose ends. You may then add a pompom and or button if you wish.

To close the top of the hat tightly go through all the stitches in the 1ST round 3 times pull tight and cut!

When you weave the yarn end in on the band of the hat go in the center of the next stitch so you are now working in your last row of stitches.  Weave the yarn in about 3 to 4 stitches back and forth 3 times.  This will ensure your yarn end won’t come loose and unravel.  Then trim your yarn end off.

wv1  wv2

wv3  wv4

wv6  wv7

wv8  wv9

wv10  wv11

wv12

I hope you enjoy making these Hats as much as I do and that you learned something new today.

If you have any questions or concerns please feel free to contact me.

Please note that you are welcome to sell your finished products however, I would appreciate if you link back to me at Teez Topperz when you post or advertise your finished pieces.

Copyright © 2018 Teez Topperz. DO NOT COPY, REPRODUCE, OR PUBLISH IN ANY MANNER. Images are the sole property of Teez Topperz and are not to be used for resale, personal reasons, or any other means. All rights reserved. The sale of your finished product is permitted; however please provide credit for the pattern to Teez Topperz. No part of this document can be reproduced or transmitted in any form by any means: electronic, mechanical, photocopying or otherwise.